
You shut off the water and called a plumber. The pipe is fixed. Now you are standing in front of a wall that has been cut open, soaked, or stained, and you are trying to figure out who handles this part and in what order. The plumber stopped the leak. The drywall work is a separate conversation entirely, and getting the sequence wrong is one of the most expensive mistakes homeowners make after a pipe failure.
Here is what to expect from the full repair process, which contractors are involved at which stage, and how to protect yourself with insurance documentation along the way.
Why Drywall Repair Is Never the First Step
Can a drywall contractor start work as soon as the pipe is fixed?
No, and a qualified drywall contractor will tell you so directly. Closing a wall or ceiling over wet framing and insulation is one of the most common and costly shortcuts in post-water-damage repair. Moisture trapped inside the wall assembly creates ideal conditions for mold, accelerates wood rot in framing, and will eventually force the same repair to be done a second time at a higher cost.
Before any drywall work begins, two things must be complete: the water source must be fully repaired and verified, and the wall cavity must be confirmed dry using moisture meter readings, not just visual inspection or the feel of the air in the room. Professional drying equipment, including commercial dehumidifiers and air movers, typically brings a wall cavity to safe moisture levels within 3 to 5 days. Air drying without equipment takes weeks and dramatically increases the likelihood of mold development.
Most drywall pros will not quote a pipe-burst repair until they can see the damage in person and confirm that mitigation is complete or nearly complete. A contractor who offers to close your walls immediately after a pipe event, before moisture verification, is skipping a step that protects you, not them.
The Correct Sequence: Who Does What and When
How many contractors are involved in a pipe burst repair?
Most pipe burst events require at least two separate professionals: a plumber and a drywall contractor. Many require a third, a water mitigation specialist who handles extraction, drying, and documentation before rebuild begins. Understanding what each one does, and in what order, helps you avoid gaps that slow the repair and complicate your insurance claim.
| Phase | Who Handles It | What Gets Done | Typical Timing |
|---|---|---|---|
| Emergency response | You, then a plumber | Shut off water at main valve; plumber isolates and repairs the broken pipe | Day 1, as fast as possible |
| Water extraction | Water mitigation company or restoration contractor | Standing water removed; wet materials assessed; drying equipment deployed | Day 1 or Day 2 |
| Drying and monitoring | Mitigation company | Industrial dehumidifiers and air movers run continuously; daily moisture readings logged | Days 2 through 5, sometimes longer |
| Demolition and assessment | Mitigation company or drywall contractor | Damaged drywall removed; insulation inspected and removed if wet; framing assessed for mold or rot | After extraction, before or during drying |
| Mold treatment (if needed) | Mold remediation specialist | Antimicrobial treatment applied to framing and remaining surfaces; clearance testing if required | After drying, before drywall installation |
| Drywall repair and finish | Drywall contractor | New panels hung, taped, mudded, sanded, and finished to match existing walls | After dry-out is verified complete |
| Paint and finish work | Painter (separate trade or same contractor) | Stain-blocking primer applied; walls repainted to match | After drywall finishing is complete |
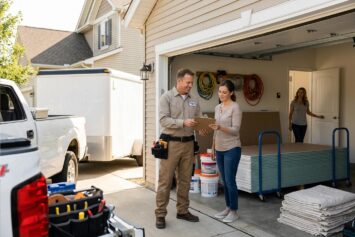
Some restoration companies handle the full sequence, from extraction through drywall and paint, under one contract. This can simplify coordination and speed up the timeline, especially for insurance claims where a single contractor’s documentation covers the entire scope. If you are managing contractors separately, confirm before each phase begins that the prior phase has been completed and signed off.
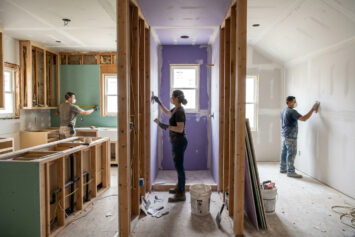
What a Drywall Contractor Actually Does in a Pipe Burst Repair
What does the drywall scope of work look like after a pipe event?
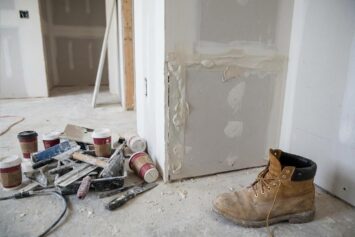
The scope depends on how much water escaped, how long it sat, and which surfaces were affected. A pipe burst inside a wall cavity that was caught quickly may require only a section of drywall to be removed, the framing inspected and dried, and a patch installed. A pipe that ran for hours, spread between floors, or affected ceilings and adjacent rooms is a full replacement job across multiple surfaces.
For a typical single-wall or ceiling event, a drywall contractor will assess the extent of damage, confirm moisture readings are at acceptable levels before starting, cut out and remove any compromised drywall, inspect the framing and insulation behind the opening, install new panels, apply tape and multiple coats of joint compound with drying time between each coat, sand to a smooth finish, and texture-match existing walls if applicable.
Texture matching is often the most time-sensitive and skill-intensive part of post-pipe-burst drywall work. If your walls have orange peel, knockdown, or skip-trowel texture, the new section must be blended invisibly into the existing finish. Most drywall pros will sample the existing texture before committing to the repair area. The quality of that match determines whether the repair is visible after paint, and it is worth asking specifically about this step when reviewing quotes.
What to Expect on Cost
How much does drywall repair after a pipe burst typically cost in 2026?
Cost varies considerably depending on how far the water spread and how many surfaces were affected. A contained single-room event with quick detection typically runs $2,000 to $5,000 in total repair costs across all trades. A pipe that ran for hours and spread to multiple rooms or traveled between floors can reach $15,000 to $25,000 once structural drying, drywall, flooring, and any mold remediation are included.
The drywall portion alone generally falls within these ranges:
- Small section repair (under 10 square feet): $300 to $700, including texture matching and finishing
- Single-wall replacement: $500 to $1,500 depending on surface area, finish level, and ceiling height
- Ceiling repair from above-floor pipe burst: $500 to $2,500, with overhead work priced higher than equivalent wall repairs
- Multi-room or multi-surface repair: $1,500 to $5,000 or more, depending on scope
- Mold remediation (if required before rebuild): $375 to $7,000 depending on extent of growth
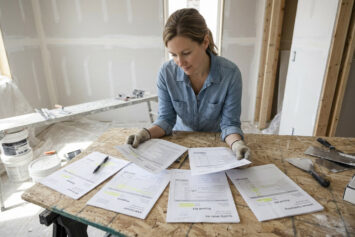
These figures cover drywall labor and materials only. Paint, flooring, cabinetry, and structural repairs are separate line items. Always get itemized quotes that separate each trade and each phase so you can compare accurately and document fully for your insurance adjuster.
How Insurance Works for Pipe Burst Drywall Repair
Does homeowners insurance cover drywall repair after a burst pipe?
Standard homeowners insurance typically covers drywall repair and replacement when the water damage results from a sudden, accidental event such as a pipe burst. The dwelling coverage portion of your policy pays to restore the structure, including walls, ceilings, and floors, to their pre-loss condition. Personal property coverage handles damaged belongings separately.
What insurance does not cover is the pipe repair itself. The plumber’s bill to fix the broken line is typically your out-of-pocket cost, usually between $200 and $800 for a standard repair. The water damage to your structure is covered; the cause of the water damage is not.
Two situations commonly result in denied drywall claims. The first is gradual damage: if an adjuster determines that the leak was slow and ongoing rather than sudden, the claim may be classified as a maintenance issue and denied. The second is delayed response: waiting days to address visible water damage before calling for mitigation signals neglect to an insurer and can limit what they will pay. Acting quickly and documenting everything protects you on both counts.
What documentation should you gather for the insurance claim?
Documentation gathered before any demolition or drying begins makes the claim process significantly smoother and reduces the risk of a partial denial or undervalued settlement. Gather the following before any contractor removes material or begins drying:
- Photographs of the damaged pipe before it is removed or repaired, including its location in the wall
- Photographs of all affected surfaces, with a ruler or tape measure visible to establish scale
- The plumber’s written assessment identifying the cause of the failure
- Moisture meter readings from the mitigation company, which document the extent of water saturation
- Daily drying logs from the mitigation company, which show progress and justify the drying scope to the adjuster
- All invoices and contractor estimates with itemized line items rather than lump-sum figures
A licensed water mitigation company generates this documentation as part of their standard process. This is one of the primary reasons experienced contractors recommend hiring a certified mitigation specialist rather than a general handyman for the extraction and drying phase. The paper trail a mitigation company produces is specifically formatted for insurance adjusters and tends to result in fewer disputes.
The Access Hole Question: Who Cuts and Who Closes
Does the plumber repair the drywall they opened to fix the pipe?
Usually not. Plumbers are skilled at plumbing. Most are not skilled drywall finishers, and patching drywall to a quality that holds a paint finish invisibly is a separate trade. It is not unusual for a plumber to cut access holes in walls or ceilings to reach a pipe and leave that opening for a drywall contractor to close.
Confirm this expectation with your plumber before work begins. Ask specifically whether their scope includes any drywall patching, or whether that will be a separate contractor. If your plumber does offer drywall patching as part of the job, ask to see examples of that work. A rough patch that will be painted over is very different from a finish-quality repair that blends into the surrounding texture, and the difference will be visible for as long as you live in the home.
When to Call a Drywall Contractor Directly vs. a Restoration Company
For a contained, single-room pipe event where the water was addressed within a few hours, a water mitigation company followed by a drywall contractor is a straightforward approach. You manage two contractors, but the scope is manageable and the timeline is predictable.
For larger events, consider a full-service restoration company that handles extraction, drying, demolition, drywall, and paint under a single contract. The advantages are clearer accountability, faster scheduling between trades, and a single point of contact for your insurance adjuster. The tradeoff is less flexibility to price-shop individual phases.
Regardless of which approach you take, the drywall contractor you hire should be willing to:
- Confirm in writing that moisture readings are acceptable before installing new drywall
- Inspect framing and insulation before closing the wall
- Specify the finish level and number of coats in their quote
- Address texture matching explicitly if your walls have any existing texture
- Provide an itemized quote that your insurance adjuster can review line by line
Find a Drywall Contractor Experienced With Water Damage Repairs
Post-pipe-burst drywall repair requires more than basic patching skill. The right contractor understands the drying sequence, knows how to inspect for hidden moisture, and can produce documentation that supports your insurance claim.
DrywallProCenter.com connects homeowners with verified drywall professionals across the country. Search by zip code, compare contractor profiles, and request quotes from multiple pros in one place. After a pipe event, starting with a qualified contractor is the most important decision you make in the rebuild process.
Recent Drywall Articles
- Drywall Cost by Room: Kitchen, Bathroom, Bedroom Compared
 You are trying to budget for a renovation and you need a rough number for each room. The challenge is that drywall pricing is not consistent across room types. A … Read more
 - What Insurance Should My Drywall Contractor Have?You asked a contractor whether they are insured and they said yes. That answer, on its own, protects you almost not at all. There are multiple types of insurance a … Read more
- How to Get Multiple Drywall Bids and Actually Compare ThemYou have three quotes and the numbers are all over the place. One comes in at $1,900, one at $2,700, and one at $3,400. The instinct is to assume the … Read more
- What to Expect on Day One When Your Drywall Contractor ArrivesThe contractor is scheduled to arrive at 8 a.m. and you are not sure what is about to happen in your house. Will they start immediately or spend the morning … Read more
- Red Flags to Watch for When Hiring a Drywall ContractorYou have a few contractor quotes in hand and one of them is significantly cheaper than the others. Or a contractor showed up unsolicited after the storm last week and … Read more
- How to Read a Drywall Contractor’s Quote Without Getting BurnedYou have three quotes in hand and they are not close to each other. One comes in at $1,800, one at $2,600, and one at $3,100 for what appears to … Read more


This article was drafted with the assistance of AI and has been reviewed and edited by our editorial team for accuracy and quality.