
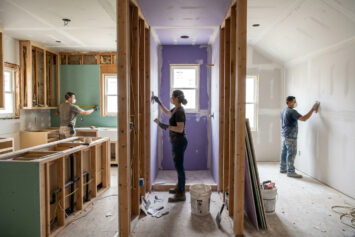
You have a contractor coming and you need to know whether to plan around a long weekend or a full two weeks. Maybe you are coordinating painters, flooring crews, or movers. Maybe you are simply trying to figure out how long your house will be torn up before it feels livable again.
The answer depends on which room, how many phases are involved, and one factor most homeowners do not account for until the job is already underway: drying time cannot be rushed, no matter how experienced the crew is.
The Number That Surprises Most Homeowners: Calendar Days vs. Active Labor Days
Why does a drywall job that seems like a few hours of work take several days?
This is the most common source of confusion in drywall project planning. The active labor on a standard room, the hanging, taping, and mudding, might total 8 to 12 hours of crew time. But those hours are spread across 4 to 7 calendar days, because joint compound needs to dry fully between each coat before the next can be applied.
A proper drywall finish requires a minimum of two to three coats of joint compound (commonly called mud), with 12 to 24 hours of drying time between each coat under normal indoor conditions. Temperature and humidity directly affect that timeline. When relative humidity exceeds 70 percent, joint compound can take twice as long to dry. When temperatures drop below 50 degrees Fahrenheit, the compound may not bond correctly at all.
Most drywall pros plan their projects around this drying constraint rather than trying to work around it. A crew that applies a second coat before the first is fully dry risks shrinkage, cracking, and delamination at the seams, which means expensive callbacks and rework. The calendar time is built into a quality job by design, not inefficiency.
Phase-by-Phase Timeline: What Happens on Each Day
What does a drywall installation sequence actually look like day by day?
A full drywall installation from raw framing to paint-ready surface moves through four distinct phases. Understanding each phase helps you set accurate expectations and coordinate other trades.
| Phase | What Happens | Typical Duration |
|---|---|---|
| Material delivery and staging | Sheets delivered and acclimated to indoor temperature; workspace cleared and prepped | Half day to 1 day |
| Hanging | Sheets measured, cut, and fastened to framing; openings for doors, windows, and electrical boxes cut out | 1 to 2 days depending on scope |
| Taping and first coat of mud | Tape embedded at all seams and corners; first coat of joint compound applied over tape and fasteners; drying required before next coat | 1 day active work, then 12 to 24 hours drying |
| Second and third coats of mud | Each coat applied and allowed to dry fully; coats feathered wider to blend seams; full drying required between each | 2 to 3 additional days including drying time |
| Sanding and finish | All surfaces sanded smooth; imperfections addressed; surface confirmed paint-ready | Half day to 1 full day |
| Texture (if applicable) | Texture pattern applied and allowed to dry; primer coat follows | 1 additional day |
Total elapsed time from first sheet to paint-ready surface: typically 4 to 7 days for a standard single room with an experienced crew, and 1 to 3 weeks for a full house. Those ranges assume normal indoor conditions, a standard Level 4 finish, and no significant framing complications.
Room-by-Room Breakdown: How Long Each Space Takes
How long does it take to drywall specific rooms?
Timeline varies by room size, ceiling height, and complexity of cuts required. The estimates below reflect a professional crew working under normal conditions, from first sheet to sanded, paint-ready surface.
| Room or Scope | Approximate Timeline | Primary Time Driver |
|---|---|---|
| Small bathroom | 2 to 3 days | Precision cuts around fixtures; moisture-resistant board required |
| Standard bedroom (12 x 12) | 3 to 5 days | Drying time between coats; straightforward hanging |
| Living room or open-plan space | 4 to 6 days | Larger surface area; more seams to tape and finish |
| Basement (1,000 sq ft floor area) | 6 to 14 days | Irregular framing around plumbing and HVAC; multiple rooms |
| Vaulted or high-ceiling room | Add 1 to 3 days to standard estimate | Scaffold setup; angled cuts; overhead finishing takes longer |
| Whole house, new construction (2,000 sq ft) | 1 to 3 weeks | Crew size; open framing allows efficiency; finish level matters |
| Whole house, remodel (2,000 sq ft) | 2 to 4 weeks | Working around existing finishes; irregular conditions; removal adds time |
Ceiling installations consistently take longer than the same square footage on walls. Overhead work is physically slower, requires more precise handling to avoid sagging before fasteners are set, and is harder to sand and finish cleanly. If your project includes ceilings, build extra days into your planning estimate.
New Construction vs. Remodel: A Real Difference in Timeline
Why does a remodel take longer than new construction for the same amount of drywall?
In new construction, the framing is open, clean, and square. A four-person professional crew can hang 45 to 80 sheets per day under these conditions, covering roughly 1,500 to 2,500 square feet of wall and ceiling surface. The work moves efficiently because there are no obstacles, the framing dimensions are consistent, and the crew can set a steady pace across the job.
In a remodel, that same crew slows down considerably. They are cutting around existing electrical boxes, fitting panels next to plumbing runs, matching panel edges to out-of-square corners from decades of settling, and protecting finished floors and trim. Removal of existing drywall, which is required in most remodels, adds another half day to two days depending on scope and how the material is being disposed of.
Most drywall pros account for a 25 to 40 percent increase in labor time for remodel work versus equivalent new construction, and that estimate is before any surprises in the walls. Hidden blocking, misaligned framing, or unexpected structural elements found during demo can extend the timeline further. When planning a remodel schedule, build in buffer time for the drywall phase rather than assuming it will run at new-construction speed.
The Variable Nobody Talks About: How Weather Slows Indoor Drywall Work
Can indoor humidity affect how long a drywall project takes?
Yes, and it is one of the most underappreciated variables in residential drywall timelines. Joint compound dries through evaporation, and high indoor humidity slows that process significantly. When relative humidity inside the work space exceeds 70 percent, compound may take twice as long to dry between coats. In a region or season with persistently high humidity, a project that would normally complete in five days can stretch to eight or nine without any change in crew size or skill level.
The ideal conditions for drywall finishing are a temperature between 55 and 75 degrees Fahrenheit and a relative humidity around 50 percent. Below 50 degrees, compound does not bond reliably. Above 95 degrees, it dries too quickly and can crack at the tape edges before it is properly spread. A contractor working in a house without climate control in summer or winter may need to stage the job differently or use fans and dehumidifiers to maintain acceptable conditions.
This is worth discussing with your contractor before work begins, particularly if your project spans a humid summer month or involves spaces that are not yet climate-controlled. A contractor who accounts for these conditions in their schedule and addresses them with equipment is protecting the quality of the finish, not padding the timeline.
What “Paint-Ready” Actually Means and Why It Matters for Scheduling
When can painters start after the drywall crew finishes?
Paint-ready does not mean the last coat of mud has been applied. It means the final coat is fully dry, the surface has been sanded smooth, all dust has been cleaned up, and a primer coat has been applied. Priming is typically handled by the drywall crew or the painting crew as the first step of their work. Either way, it must happen before finish paint goes on, or the porous drywall surface will absorb paint unevenly and produce a blotchy result.
From a scheduling standpoint, painters should not be booked to start the day after the drywall crew finishes. A one to two day buffer between the final drywall inspection and the start of painting is standard on most projects. For remodels where texture matching is involved, that buffer may need to be longer to allow the contractor to verify that the texture blends correctly before the painter applies the first coat.
Most drywall pros recommend confirming the handoff point explicitly with both trades before the project starts. Misaligned scheduling between the drywall crew and the painter is one of the most common causes of delays in residential renovation projects, and it almost always costs more time than it would have taken to coordinate properly upfront.
What Makes a Project Run Faster
Is there anything you can do as a homeowner to keep the timeline on track?
Several factors within your control meaningfully affect how smoothly a drywall project runs. Contractors are often delayed by conditions in the home rather than their own workflow.
- Clear the space before the crew arrives. Furniture, stored items, and floor coverings should be removed from the work area before the first day. Setup and protection take time and add to the labor clock.
- Confirm all rough-in work is complete. Electrical, plumbing, and HVAC rough-in must be inspected and approved before drywall goes up. A drywall crew that shows up to find an open electrical inspection creates a delay that is difficult to recover from without rescheduling.
- Maintain a stable indoor temperature. If the space has climate control, keep it running during the project. Stable temperature and humidity allow compound to dry on the expected schedule rather than extending every coat by several hours.
- Avoid last-minute changes to the scope. Adding a wall, changing a ceiling height, or moving an outlet after hanging has begun requires demolition and rework. Changes mid-project are the fastest way to extend a timeline and generate additional cost.
- Let the contractor set the pace. Asking a crew to rush the drying phases to meet a hard deadline is how seam failures and surface cracks happen. A contractor who presses for adequate drying time is protecting the quality of their own work.
When to Hire a Specialist Rather Than a Handyman
A handyman may be sufficient for a single small repair. For any full-room installation, basement finishing, or multi-room project, a dedicated drywall contractor almost always delivers better results in less total time. A specialist crew has the tools, the supply chain, and the finishing technique to move efficiently through each phase without the delays that come from learning on the job or renting equipment that is unfamiliar.
Hire a dedicated drywall contractor when:
- The project covers more than one room or includes ceilings
- A Level 4 or Level 5 finish is required, where surface quality directly affects how the room looks after paint
- Texture matching is needed on existing walls
- The project involves vaulted or high ceilings that require scaffolding or lifts
- The timeline is fixed and delays would affect other trades already scheduled
- The project is part of a permitted renovation where inspection will cover the drywall work
Find a Drywall Contractor and Get Your Timeline Right
The right contractor will give you a realistic schedule upfront, explain what is driving each phase of the timeline, and coordinate the handoff to painters and other trades without leaving gaps that cost you days. That kind of project clarity starts with hiring someone who has done this work enough times to know how long it actually takes.
DrywallProCenter.com connects homeowners with verified drywall professionals across the country. Search by zip code, compare contractor profiles, and request quotes from multiple pros in one place. Whether you are planning a single room or a full home, finding the right contractor starts here.
Recent Drywall Articles
- Drywall Cost by Room: Kitchen, Bathroom, Bedroom Compared
 You are trying to budget for a renovation and you need a rough number for each room. The challenge is that drywall pricing is not consistent across room types. A … Read more
 - What Insurance Should My Drywall Contractor Have?You asked a contractor whether they are insured and they said yes. That answer, on its own, protects you almost not at all. There are multiple types of insurance a … Read more
- How to Get Multiple Drywall Bids and Actually Compare ThemYou have three quotes and the numbers are all over the place. One comes in at $1,900, one at $2,700, and one at $3,400. The instinct is to assume the … Read more
- What to Expect on Day One When Your Drywall Contractor ArrivesThe contractor is scheduled to arrive at 8 a.m. and you are not sure what is about to happen in your house. Will they start immediately or spend the morning … Read more
- Red Flags to Watch for When Hiring a Drywall ContractorYou have a few contractor quotes in hand and one of them is significantly cheaper than the others. Or a contractor showed up unsolicited after the storm last week and … Read more
- How to Read a Drywall Contractor’s Quote Without Getting BurnedYou have three quotes in hand and they are not close to each other. One comes in at $1,800, one at $2,600, and one at $3,100 for what appears to … Read more


This article was drafted with the assistance of AI and has been reviewed and edited by our editorial team for accuracy and quality.